An 18th Century Tape Loom
I occasionally get emails from folks looking for help with inkle
weaving through my website, and I have to say, it's always a thrill to know that
someone found info here to be of use in their own ventures. One such
person was Patricia McKinney, whom I helped get started on her inkle loom
early in the summer of 2005. She's been doing great, I must say!
Another fiber addict recruited for the cause... Anyway, after a month or
two, she emailed me a picture of a loom she wanted to start weaving on, wanting
to know if I had any tips for her. I responded back right away with, where
did you get that?! Is it an antique that you will work on, or a
reproduction?! Wow! I want one!
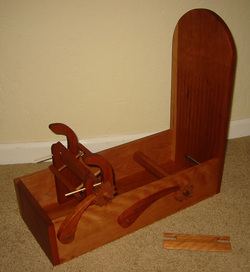
Turns out that Pat and her husband Rudy do both French and Indian War and Revolutionary War reenactment. Rudy participates with Roger's Rangers for their French and Indian War work, a group of colonial men who fought for the British Crown against the French and Indians. In his Revolutionary War work, he is a scout for 71st Highland Regiment of Foot, a Scottish unit that fought to keep the colonies under British rule, (OK, I guess somebody has to be the British for the re-enactments to work out!) and he also sometimes plays an Eastern longhunter, who were explorers who paved the way for settlers coming into Kentucky and Tennessee. Pat and Rudy have the elusive June 1993 magazine Early American Life, a much-requested reprint of a special newsstand-only issue in 1985, called Early American Life Crafts. This issue has the article, "A c.1780 Tape Loom: How to Make It and Use It," by Jean Creznic, and contains a construction design and brief instructions on how to use a tape loom modeled on one found in the Hershey Museum of American Life in Hershey, Pennsylvania. Pat sent me my own copy (more than once, too, thanks a million, Pat!), it turns out that back issues are no longer available due to a 2003 bankruptcy and restructuring the magazine went through. Thank goodness Pat and Rudy still had the issue! Rudy made one for Pat, and that was what she sent a picture of to me. I'm getting the idea that Rudy has been making a "few" of these looms these days, the one he made for me in cherry, seen above, is simply exquisite. I love it! He can be reached by email here, if you'd like to inquire for your own. I asked for mine in unadorned cherry as more relevant for my reenactment time period, but the article shows a typical early American painted and decorated finished loom, sort of Pennsylvania Dutch barn medallion style.
I started weaving on this loom mid-August, and I am fascinated by the possibilities. It is so interesting to me to learn a new tool, and how the hands train themselves to adapt efficiently to new techniques. I can tell I will be putting some serious time in on this loom, and CROFT wants me to demonstrate with it at their events, too. At least it's 100-odd years closer in form than my Schacht inkle loom, though I am currently trying to sweet-talk Rudy into some other, and older, designs! (15/16/17th Century Box Loom, anyone?)
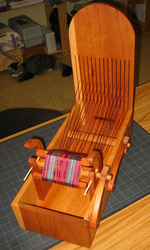
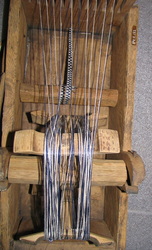
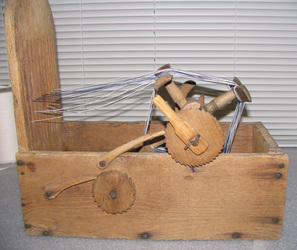
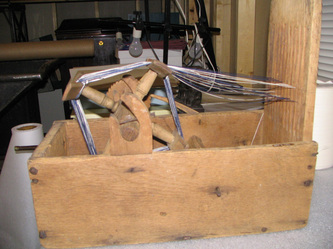
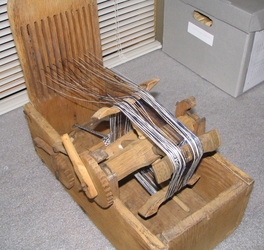
So here's my first warp, from a few angles. In the first
shot, you can see the warp reel and the take-up reel very well, and the current
braking arrangement, as well as into the interior of the box. The warping
reel is removable, you just pull out the two little skewer-like dowels, and the
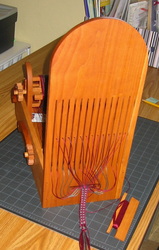
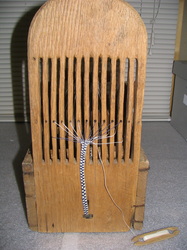
reel lifts out. The second picture shows the loom from the other
direction, and I've started to weave a bit. You can also see the lovely
little shuttle Rudy provided with the loom, with the preferred tapered beating
edge as well. This was a really nice touch, the article didn't specify
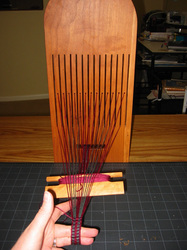
shuttle tips for some reason. The last picture is taken from my point of
view while weaving, and I've woven enough to feed the finished end of the tape
into the take-up slot and attach it to the take-up reel. Nifty arrangement,
I can see winding on a ton of yardage for trim.
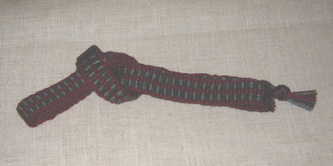
I don't have much experience weaving on rigid heddle type looms, but I found this to be surprisingly different from weaving on my inkle looms. On inkle, I tend to weave under pretty high tension, and so have to beat correspondingly firmly. In the case of this style tape loom, because the weaver holds the warp under tension by hand, as you can see in the last picture, tensioning is a whole different experience. It felt at first very loosey-goosey to me, but as I continued, I found that high tension wasn't really as important as consistent tension. Don't get me wrong, I'll still be working with relatively high tension on the inkle looms, it's just not as necessary on the tape loom, though I guess it would depend on the finished effect the weaver wants. In addition, the motion of raising the warp by hand up and down on the rigid heddle felt (and looked!) very dynamic to me after years of inkle weaving where the warp stays relatively horizontal. As you can also see in the last picture, I ended up bracing the loom against the edge of my cutting mat to keep it from sliding forward. This will present an interesting challenge in demonstration: I'll need a bit more room to operate this loom effectively. On the other hand, I can sit upright at a comfortable table height pretty well, and the box structure is amazingly convenient for holding small items, like spare shuttles and small scissors, while I weave, and for stowing the working shuttle when I'm not. Anyone else ever had their shuttle fall out of the warp of their inkle loom while in transit and yank the weaving out of shape? That won't happen so much on this loom.
So, onto discoveries and drawbacks. The obvious drawback is of course that the weaver is limited in the width of the warp by the spaces available in the rigid heddle. This one has 27 spaces total, 13 holes and 14 slots, and with a warp of 5/2 cotton, I got roughly 5/8" wide finished tape. Doesn't bother me, but the width limit is relevant. On the other hand, one could still weave trim and other decorative fringes as well, the take up slot and reel are wide enough for the extra fibers. The discovery didn't happen until I actually started weaving, and is probably more obvious to more experienced rigid heddle weavers. Because of how the brake arrangement functions, you have to wind the warp on from under the warp reel and then back over the top, as you can see in the first picture. This makes the warp run at an angle, down from the heddle holes to under the bottom of the warp reel. I think the warp should run more horizontally, from the heddle holes to over the top of the warp reel, which would also help with achieving better sheds while weaving. I was thinking that the brake arms should move around to the other side of the reel cogs, so you can wind the reels in the other direction. When I looked in Evelyn Neher's Inkle, I found some pictures of old tape looms from the same region that seem to use that arrangement as well. I plan to take more of a look at rigid heddle weaving in general, now. In our back and forths about using the loom, I told Pat that I bet the person who designed this loom wasn't a weaver, because as soon as you start to weave, you realize there's something funky about the brake arrangement, and she agreed. Rudy has also proposed another solution: to turn the warping reel over and move that brake to the other side of the box where there's room to place it in front of the cog, I'll take him up on it as soon as I can part with the loom again for long enough! I think he plans to make this change on future looms as well, and we're talking about possibly lengthening the box to make it so that both brakes would fit on the same side from the other direction.
I don't have much yet in the way of tips for weaving on the
reproduction
loom. My own errors in weaving technique have only shown me a couple
things so far, I need time to make more mistakes! For the first warp, I
pre-measured and cut it using a couple of c-clamps to wind onto, my warping
board is still in storage at my parent's house. I then wound on the warp
front to back, that is, I threaded the heddle first, and then pulled the warp
through it to tie to the reel and then wind it on. I was taught to dress
floor looms this way, the heddle helps undo tangles and even out winding tension
when you have to wind a warp by yourself. So what I didn't realize in this
case was that the heddle spreads out the warp threads slightly wider than the take up
reel (duh) and so while I was watching the warp go through the heddle from the
front while reaching blindly around behind the heddle to wind the reel, the
outside edges were actually binding around the cog core. Easily fixed, but
it struck me as funny because it happened because of habits I developed for
other types of looms. My first clue that I would need to re-think a few
assumptions, or at least keep an open mind! On Pat's loom, she tells me
she went right to winding the warp directly onto the reel, while it was removed
from the loom, and then threading forward through the heddle. I'm trying
this next, (she says she's going to try my way next) and I suspect that it will
be the more convenient way to dress this loom!
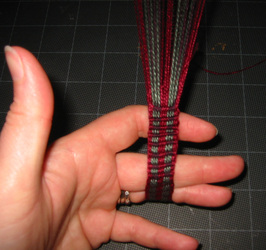
In the picture on the left above, you can see my next error: when I wound too much of the finished tape onto the take up reel, I didn't give myself enough room to effectively beat in the next few shots, it made me try to beat in the weft too close to the curve where I hold the tape, resulting in this ridged effect. I see this happen sometimes in inkle weaving too, when weavers advance the warp a bit too far while weaving, but it was much more pronounced here. My first tape has a couple of these spots! I'm also curious to see what effect the brake adjustment will have on the warp movement. I'm hoping it will make it so I don't have to angle the warp up and down so sharply to change sheds, and maybe that will also help mitigate this ridging effect. In the next picture you can see that my selvedges aren't stellar, and I found that it was pretty easy to drop outside threads between shots, I think because of how sharply the width of the tape narrows from the heddle to the finished tape. It's easy to miss the outside threads in the up and down warp movement, I'm guessing the brake adjustment and accompanying warp "leveling" will impact this as well. And of course, it will definitely help for me to put some time in on getting used to holding the tension by hand while I weave. It really is a strange sensation for me.
In the picture on the left above, you can see my next error: when I wound too much of the finished tape onto the take up reel, I didn't give myself enough room to effectively beat in the next few shots, it made me try to beat in the weft too close to the curve where I hold the tape, resulting in this ridged effect. I see this happen sometimes in inkle weaving too, when weavers advance the warp a bit too far while weaving, but it was much more pronounced here. My first tape has a couple of these spots! I'm also curious to see what effect the brake adjustment will have on the warp movement. I'm hoping it will make it so I don't have to angle the warp up and down so sharply to change sheds, and maybe that will also help mitigate this ridging effect. In the next picture you can see that my selvedges aren't stellar, and I found that it was pretty easy to drop outside threads between shots, I think because of how sharply the width of the tape narrows from the heddle to the finished tape. It's easy to miss the outside threads in the up and down warp movement, I'm guessing the brake adjustment and accompanying warp "leveling" will impact this as well. And of course, it will definitely help for me to put some time in on getting used to holding the tension by hand while I weave. It really is a strange sensation for me.
When I first started thinking about the brake function issue of
the reproduction loom's design, I decided to send an email to the museum to see
if I could get a picture of the extant artifact. Amy Bischof, curator at the Hershey Museum, graciously forwarded
these pictures along of the tape loom they have on exhibit there, that the
article says its design is based on. Doesn't look very similar at first
glance, does it? However, the function is classic, and I noted with
satisfaction the positions of the brakes. All in all, I can see how one
could go from pictures of this loom to the design the article ended up with,
especially if the designer wasn't a weaver, or was a very new one. This
one is much more robust, I assume as a result of being a home-fashioned object
of use. I actually went off on a little mental tangent in thinking along
those lines, how many of our tools do we make anymore? In my house, none.
I buy them. I actually walked around the house looking. What few
small tools I make are all related to my reenactment, and can't be bought
commercially, or I would, and are usually temporary, like a hole-punching trough
for bookbinding. I have a vague memory from childhood that my Grandpa, who
was raised on a farm in Kentucky, used to cut tool handles by hand, like for the
axe and mallet, but Dad bought axe handles from the lumber store. Grandpa
could lay cane brakes for the garden, too, but eventually switched to store
bought fencing rolls. I wonder what things I could make for myself that
would fill this same kind of niche? I'll try and look for ways from now
on, it would be an interesting study. It reminds me that for some
historical crafts, you have to make your own period tools, too, to get the full
understanding of the true process in period. As a reenactor, I know this,
but still manage to forget sometimes, shame on me.
I also found a copy of the book Tape Looms Past and Present (Second Edition) by Bonnie Weidert on Abebooks, and it was interesting to get her perspectives. Besides being the only title I've ever heard of devoted exclusively to tape looms, I'd say this book is also perfect for those who have little or no other experience in narrow-ware work, and there are some good ideas on tips and tricks, like the use of leader cords for the warping reel. There's also a brief overview of tape-weaving in history, and many excellent photos of various historical tape looms, as well as some inspiring reproductions. She has included several pages of sample drafts in color for the beginning weaver, I was pleased to notice that the nomenclature for noting the draft is the same as for inkle weaving, it seems a natural cross-over. Ms. Weidert also hosts a website for tape weaving, www.tapelooms.com, that covers a broad range of topics for the aspiring tape-weaver. I have joined their forums myself, and hope to learn much from them. The book is available directly from Ms. Weidert at her site, as well, for those who want their own copy.
I also found a copy of the book Tape Looms Past and Present (Second Edition) by Bonnie Weidert on Abebooks, and it was interesting to get her perspectives. Besides being the only title I've ever heard of devoted exclusively to tape looms, I'd say this book is also perfect for those who have little or no other experience in narrow-ware work, and there are some good ideas on tips and tricks, like the use of leader cords for the warping reel. There's also a brief overview of tape-weaving in history, and many excellent photos of various historical tape looms, as well as some inspiring reproductions. She has included several pages of sample drafts in color for the beginning weaver, I was pleased to notice that the nomenclature for noting the draft is the same as for inkle weaving, it seems a natural cross-over. Ms. Weidert also hosts a website for tape weaving, www.tapelooms.com, that covers a broad range of topics for the aspiring tape-weaver. I have joined their forums myself, and hope to learn much from them. The book is available directly from Ms. Weidert at her site, as well, for those who want their own copy.
